
Custom Elements - A technology that makes up Web Components
by Eiji Kitamura
This article is a cross-post from an article on webcomponents.org.
Needless to say, HTML is the most important building block of web pages. However, because the features it provides are low-level, trying to build complex components often quickly leads to a confusing structure filled with endless divs. What if you could build custom components packed with the functionality you need? What if you could give those components tag names that accurately describe what they do? What if you could extend existing tags to add new capabilities? Custom Elements makes all of that possible.
What are Custom Elements? #
Custom Elements allow developers to define their own custom HTML tags and use them on their sites, simplifying repeated components and dramatically reducing the effort required to reuse them.
How to Create a Custom Element #
Defining a Custom Element is simple. Just pass a string representing the element name as the first argument to document.registerElement().
var XComponent = document.registerElement('x-component');Once defined, you can use <x-component> in your HTML.
<x-component></x-component>Note: <x-component> can exist in the document before the element is defined. For details, please check the HTML5Rocks article.
If you want to target browsers that do not support Custom Elements, make sure to load the polyfill, webcomponents.js.
<script src="bower_components/webcomponentsjs/webcomponents.js"></script>Tag Name Rules #
Custom Element tag names have a rule: "they must contain a '-'". Please note that omitting the '-' will result in an error.
Good
- x-component
- x-web-component
Bad
- web_component
- xelement
- XElement
Imperative Usage #
While tags can be used declaratively in HTML like <x-component></x-component>, they can also be used imperatively.
var XComponent = document.registerElement('x-component');
var dom = new XComponent();
document.body.appendChild(dom);
In the example above, the element's constructor is instantiated using new.
document.registerElement('x-component');
var dom = document.createElement('x-component');
document.body.appendChild(dom);
In this example, it is instantiated using document.createElement().
Adding Functionality to a Custom Element #
Just having a usable tag name isn't very helpful on its own. Let's add some functionality to this Custom Element.
First, call Object.create() passing HTMLElement.prototype as an argument to obtain a prototype object. Next, add any functions or properties you want to that object. This becomes the prototype for your new Custom Element. Pass this object as the value for the 'prototype' key in the object provided as the second argument to document.registerElement().
var proto = Object.create(HTMLElement.prototype);
proto.name = 'Custom Element';
proto.alert = function() {
  alert('This is ' + this.name);
};
document.registerElement('x-component', {
  prototype: proto
});
Inheritance Structure #
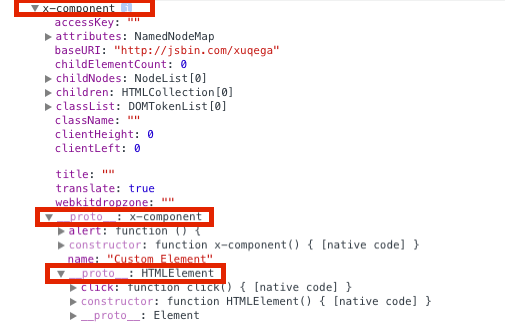
When inspecting a Custom Element defined this way in Chrome DevTools, you can see that x-component, which has HTMLElement as its prototype, is in turn the prototype of the x-component instance.
Type Extension Custom Elements #
You can also create Custom Elements that extend native DOM elements while preserving their existing functionality. These are called Type Extension Custom Elements, and they can be used by adding an is attribute with the Custom Element's tag name as its value to an existing tag.
<div is="x-component"></div>To create a Type Extension Custom Element, pass a string of the tag name you want to extend with the extends key in the second argument to document.registerElement(). Also, use the prototype of the tag you want to extend for prototype, rather than HTMLElement.
Here is an example of extending the input tag:
var XComponent = document.registerElement('x-component', {
  extends: 'input',
  prototype: Object.create(HTMLInputElement.prototype)
});
Notice that the element to extend is specified by its tag name with extends: 'input', and HTMLInputElement is used instead of HTMLElement. Now you can extend the input tag as <input is="x-component">. By adding features to the prototype, you can add new APIs to the input tag.
Note: Some of you might be tempted to intentionally mismatch extends and prototype to see what happens. While it's possible—and who knows, maybe an unexpected idea will emerge—in my experience, it didn't yield very useful results.
The GitHub Use Case #
From the explanation so far, it might be hard to picture what Type Extension Custom Elements are useful for. In fact, a wonderful implementation that makes the most of them is already running on GitHub.
GitHub displays many strings indicating when source code was updated, and as shown in the image, they are formatted as relative time. As a developer, you can immediately tell that displaying relative time requires a bit of logic, and GitHub achieves this using a set of Type Extension Custom Elements called time-elements.
Inspecting the element in DevTools reveals the following:

Pay attention to four points:
- The
timetag is used - An absolute date and time is specified in the
datetimeattribute is="relative-time"is specified as a Type Extension Custom Element- A relative date and time is specified as the
TextContent
This is achieved by the Type Extension Custom Element calculating the relative time from the absolute date and time (datetime) and inserting it into the TextContent.
The benefit of using Type Extension Custom Elements is that even in environments where JavaScript is disabled, the browser does not support Custom Elements, or the polyfill fails to run properly, the content of the time element is displayed as-is as a fallback, preserving the semantics. If you try disabling JavaScript in DevTools, you can confirm that it simply displays the absolute date and time.
For more details on time-elements, check out How GitHub is using Web Components in production on webcomponents.org.
Lifecycle Callbacks #
In the relative-time example, I mentioned inserting relative time into the TextContent, but when does that actually run? With Custom Elements, you can define functions called lifecycle callbacks that are invoked when various events occur.
.createdCallback() Called immediately after the element is created.
.attachedCallback() Called when the created element is inserted into a document's DOM.
.detachedCallback() Called when the created element is removed from a document's DOM.
.attributeChangedCallback() Called when an attribute of the created element is changed.
In the relative-time example, calculating the relative time and updating the TextContent is handled during .createdCallback() and .attributeChangedCallback().
Example #
To use lifecycle callbacks, define the functions on the prototype object when defining the Custom Element.
var proto = Object.create(HTMLElement.prototype);
proto.createdCallback = function() {
  var div = document.createElement('div');
  div.textContent = 'This is Custom Element';
  this.appendChild(div);
};
var XComponent = document.registerElement('x-component', {
  prototype: proto
});
Using with Template and Shadow DOM #
Combining Custom Elements with Template and Shadow DOM improves development efficiency and reusability. Templates allow you to define element contents declaratively (that is, simply by writing plain HTML). Shadow DOM allows you to encapsulate styles, IDs, classes, and more within the element.
To achieve this, combine them with Template and Shadow DOM inside .createdCallback(), which is called when the Custom Element is created.
For more on Template and Shadow DOM, please refer to the previous articles (Template, Shadow DOM).
HTML
<!-- Template definition -->
<template id="template">
  <style>
    ...
  </style>
  <div id="container">
    <img src="http://webcomponents.org/img/logo.svg">
    <content select="h1"></content>
  </div>
</template>
<!-- Using the Custom Element -->
<x-component>
<h1>This is Custom Element</h1>
</x-component>JavaScript
var proto = Object.create(HTMLElement.prototype);
proto.createdCallback = function() {
  // Add Shadow DOM
  var root = this.createShadowRoot();
  // Add Template
  var template = document.querySelector('#template');
  var clone = document.importNode(template.content, true);
  root.appendChild(clone);
}
var XComponent = document.registerElement('x-component', {
  prototype: proto
});
You can view the actual code here.
Browser Support #
As of November 2014, Custom Elements are supported in Chrome, Opera, and in Firefox behind a flag. Check chromestatus.com or caniuse.com for the latest support status. The polyfill webcomponents.js (renamed from platform.js) is also available.
Conclusion #
What did you think? As mentioned in the link above, Custom Elements are already in practical use on GitHub, partly because they are relatively practical to polyfill compared to other Web Components specs (working even in IE9). Give them a try yourself!
If you want to learn more about Custom Elements, the following resources are also helpful: