
Generate beautiful JSDoc with Bootstrap
by Eiji Kitamura
I couldn't find much information about this in Japanese when searching, so I'm leaving a note here.
JSDoc #
Needless to say, JSDoc is a command-line tool that automatically generates reference documentation from comments left in your JavaScript source code. For example, if you write comments in your source code like this:
/**
 * Resolve url from `srcset` syntax http://www.w3.org/html/wg/drafts/srcset/w3c-srcset/
 * @param  {string}           src    Default URL
 * @param  {string}           srcset `srcset` argument
 * @param  {number|undefined} dpr    Device pixel ratio
 * @param  {number|undefined} width  Viewport width
 * @return {string} Parsed and resolved URL
 * @private
 */
var resolveSrcset = function(src, srcset, dpr, width) {
  if (srcset === null) return src;
  ...
};
It outputs HTML like this:
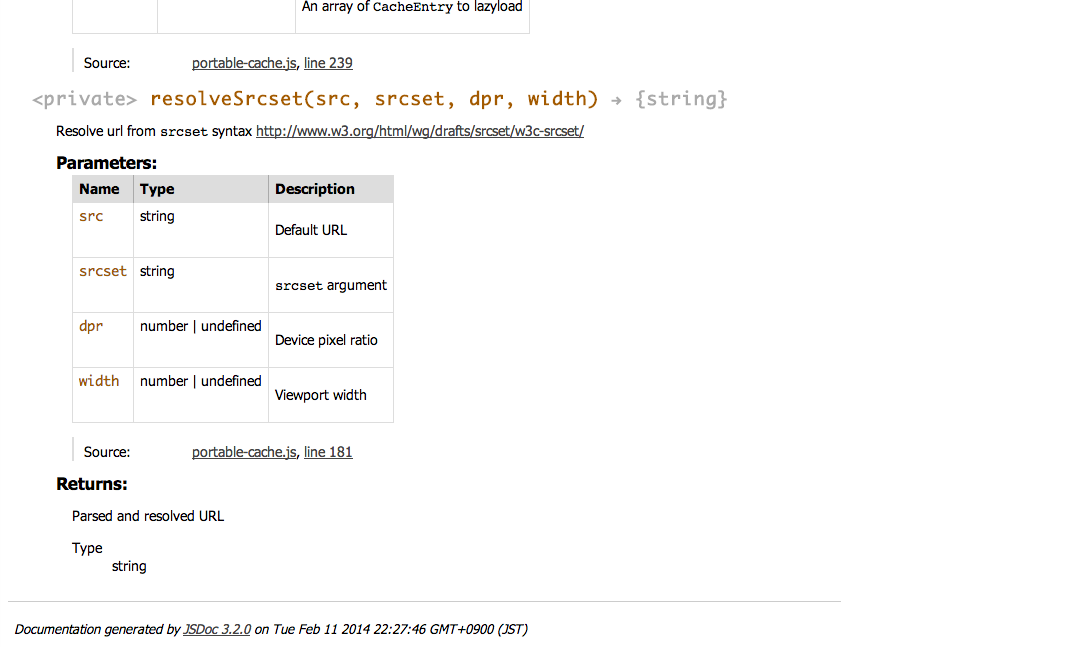
Very handy.
Grunt #
Please refer to the official documentation for details, but these days you can easily integrate this into your workflow using Grunt. For instance, here's what I use Grunt for:
- Place source code fetched via Bower into arbitrary paths (grunt-bower-task)
- Spin up a local development server (grunt-contrib-connect)
- Whenever a source file is saved (grunt-contrib-watch):
- Concatenate JS files if there are multiple (grunt-contrib-concat)
- Minify file size (grunt-contrib-uglify)
- Refresh the page open in the browser (live reload) (grunt-contrib-watch)
To this list, you can also add "generate reference documentation with JSDoc (grunt-jsdoc)".
However, as you can see, the default output of grunt-jsdoc looks quite plain and bare. With a little extra effort, though, you can give it a sleek design like this:

docstrap #
Actually, grunt-jsdoc includes docstrap as a dependency. By using it, you can easily style your docs with a polished bootstrap look. You can choose themes provided on bootswatch.com.
As for how to use it, the documentation is somewhat hard to follow and there wasn't much information online, so I'm documenting it here.
First, here is how to configure Gruntfile.js:
jsdoc: {
  dist: {
    src: ['src/*.js', 'README.md'], // Path to source files you want to document
    options: {
      destination: 'doc', // Output destination path
      configure: 'jsdoc-config.json' // docstrap configuration file
    }
  }
}
...
grunt.loadNpmTasks('grunt-jsdoc');
Set it up like this (if you're unfamiliar with Grunt conventions, you'll need to learn those basics first). The key point is configure: 'jsdoc-config.json', which requires writing the details in a separate file. While grunt-jsdoc's own settings can be written directly in Gruntfile.js, docstrap's settings must be specified in a separate file.
Since we specified a file named jsdoc-config.json here, let's create a file with that name. Its contents should look like this:
{
  "plugins": [
    "plugins/markdown" // Adding the Markdown plugin lets you write comments in Markdown!
  ],
  "templates" : {
    "cleverLinks"     : false,
    "monospaceLinks"  : false,
    "default"         : {
      "outputSourceFiles" : true
    },
    "systemName"      : "PortableCache",
    "footer"          : "",
    "copyright"       : "Developed by Eiji Kitamura",
    "navType"         : "vertical",
    "theme"           : "united", // Theme name from bootswatch.com in lowercase
    "linenums"        : true,
    "collapseSymbols" : false,
    "inverseNav"      : true
  },
  "markdown"  : {
    "parser"   : "gfm",
    "hardwrap" : true
  },
  "opts": {
    // Key point here
    "template": "node_modules/grunt-jsdoc/node_modules/ink-docstrap/template"
  }
}
The critical part is opts.template, which needs to be written exactly as shown. Then, in templates.theme, enter the name of your preferred theme from bootswatch.com in lowercase. After that, just run the task and you should be good to go.
Bonus #
JSDoc can actually incorporate Markdown files like README.md as the landing page. To use it, simply add it to the list of source files to process, as shown above. Also, this is another built-in JSDoc feature, but if you include the Markdown plugin, you can use Markdown syntax within your comments, which is extremely convenient.